| |

How to Marble a Pumpkin with Nail Polish

As an Amazon Associate, I earn from qualifying purchases. This post may contain affiliate links. See our full disclosure here.

How to marble a pumpkin using nail polish

I love Halloween. It’s actually my birthday. Maybe that’s why I always look forward to coming up with new pumpkin decorating ideas each year. I’m a big fan of no carve pumpkin ideas as well as colorful pumpkins so I combined the two to make these fun marble pumpkins. It’s actually really easy to marble a pumpkin with nail polish.

Once you do one, you’ll probably want to marble about a dozen pumpkins so make sure you buy plenty…it’s addicting.

Pumpkin that has been marbled using nail polish

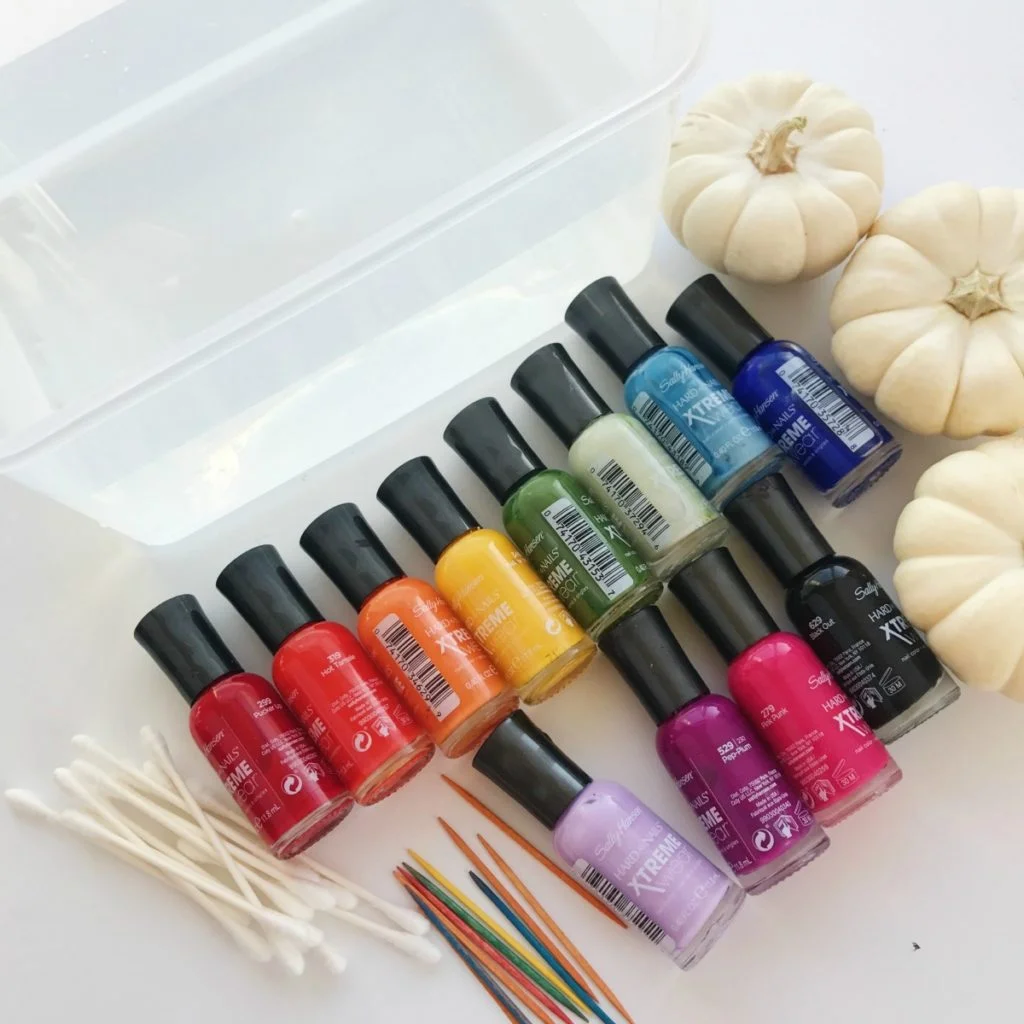
Pumpkin Marbling Supplies

  • Mini pumpkins – Look for pumpkins that have a stem, it makes it easier to dip them. I found mine at Trader Joe’s. If you can’t find white, just spray paint some orange ones. I like this white flat spray primer.
  • Nail polish – I used Sally Hansen Extreme Wear Nail Polish. Not all nail polish brands will work. The Sally Hansen brand is known to be one of the best brands when it comes to nail marbling which uses a very similar technique. The Sinful Colors brand also works great.
  • Water Container – Make sure it’s deep enough to fully submerge a mini pumpkin.
  • Room Temperature Water (Distilled Water Works Best!!!)
  • Toothpicks
  • Q-Tips
  • Gloves (optional) – these are good to use if you can’t find pumpkins with long stems).

How to marble a pumpkin

Marble a Pumpkin With Nail Polish: Step by Step Directions

How to marble a pumpkin using nail polish

1. Fill a Container With Water

Fill a container with room temperature water. It’s important the water is room temperature so the polish can spread easily.

2. Open Nail Polish

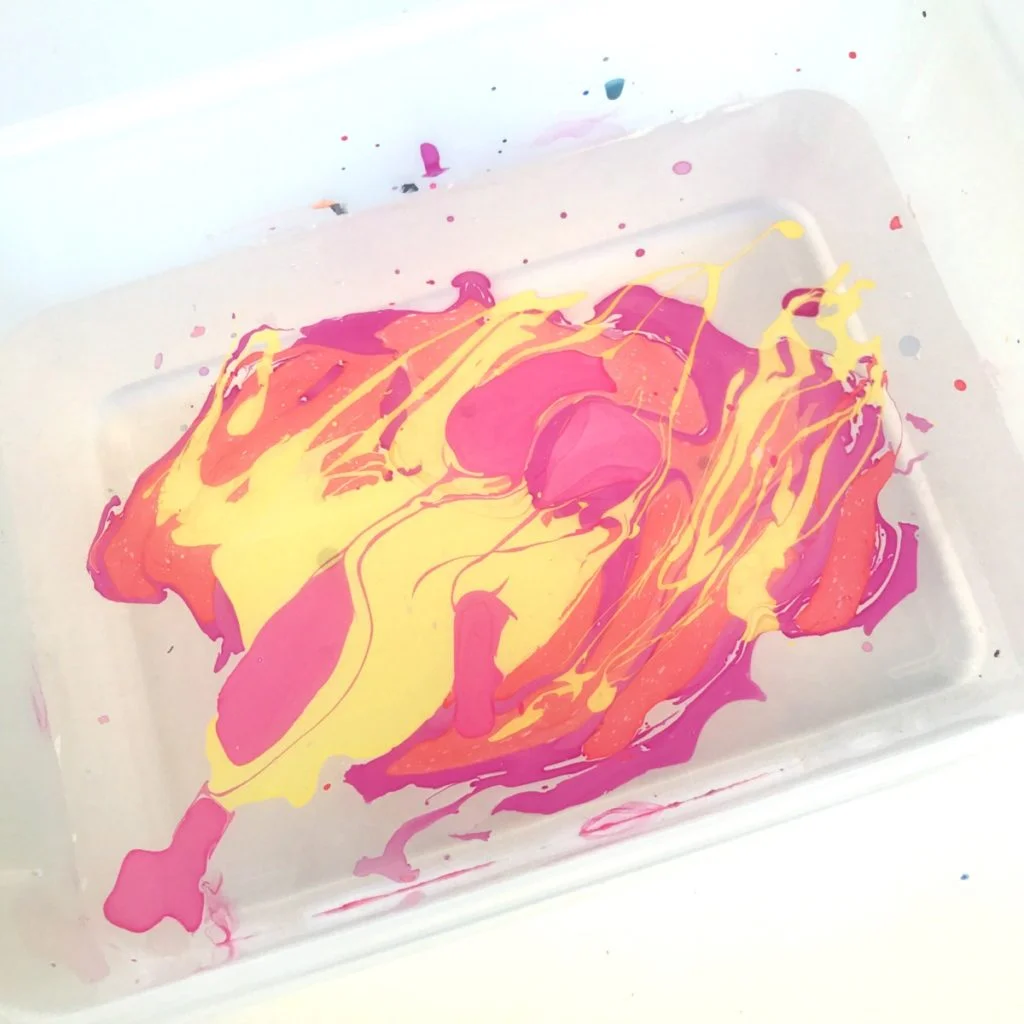
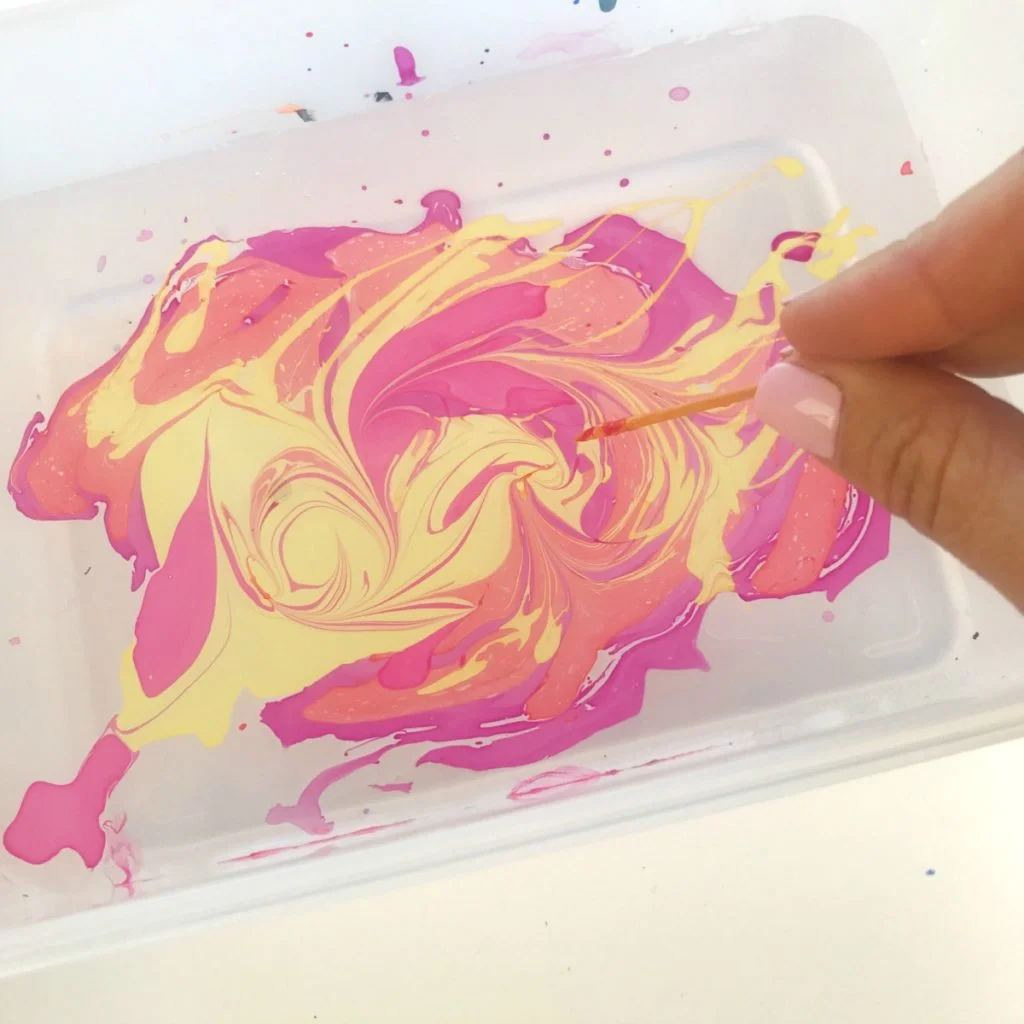
Open the polishes that you’ll be using. You need to work fast. I used 3-4 colors on each pumpkin.

3. Safety Precautions

Make sure the room you’re working in is well ventilated!!

4. Use Brush to Add Nail Polish to Water

With the nail polish brush close to the water, shake the brush and let the polish fall into the water. Be sure the brush is close to the water otherwise the polish will sink to the bottom.

Nail polish in the water

5. Repeat With Additional Colors

Add additional colors and work quickly before the polish can dry.
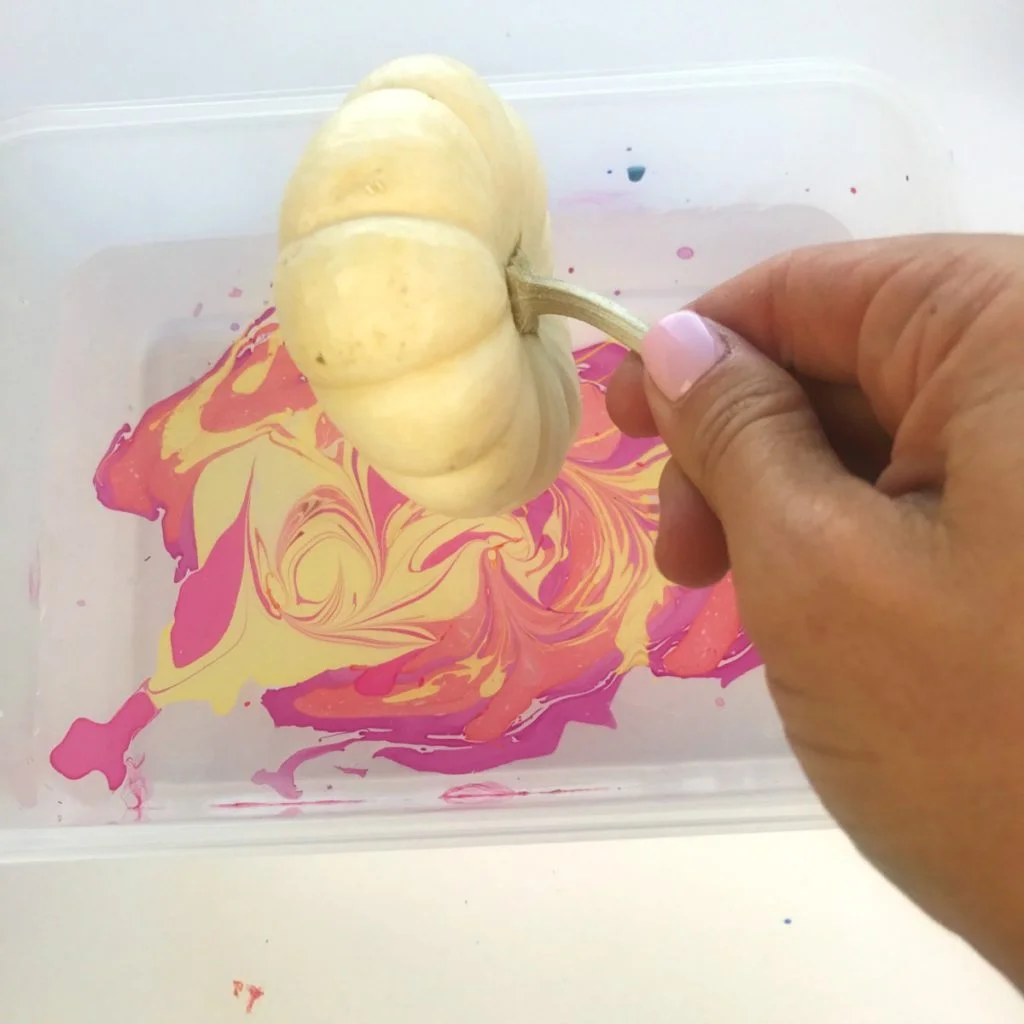
Creating a marbled effect with nail polish

6. Dip the Pumpkin

Holding the pumpkin by the stem, submerge the pumpkin into the water. It’s best to dunk the pumpkin sideways if you can otherwise most of the polish will end up on the bottom of the pumpkin.

Pumpkin marbling using nail polish

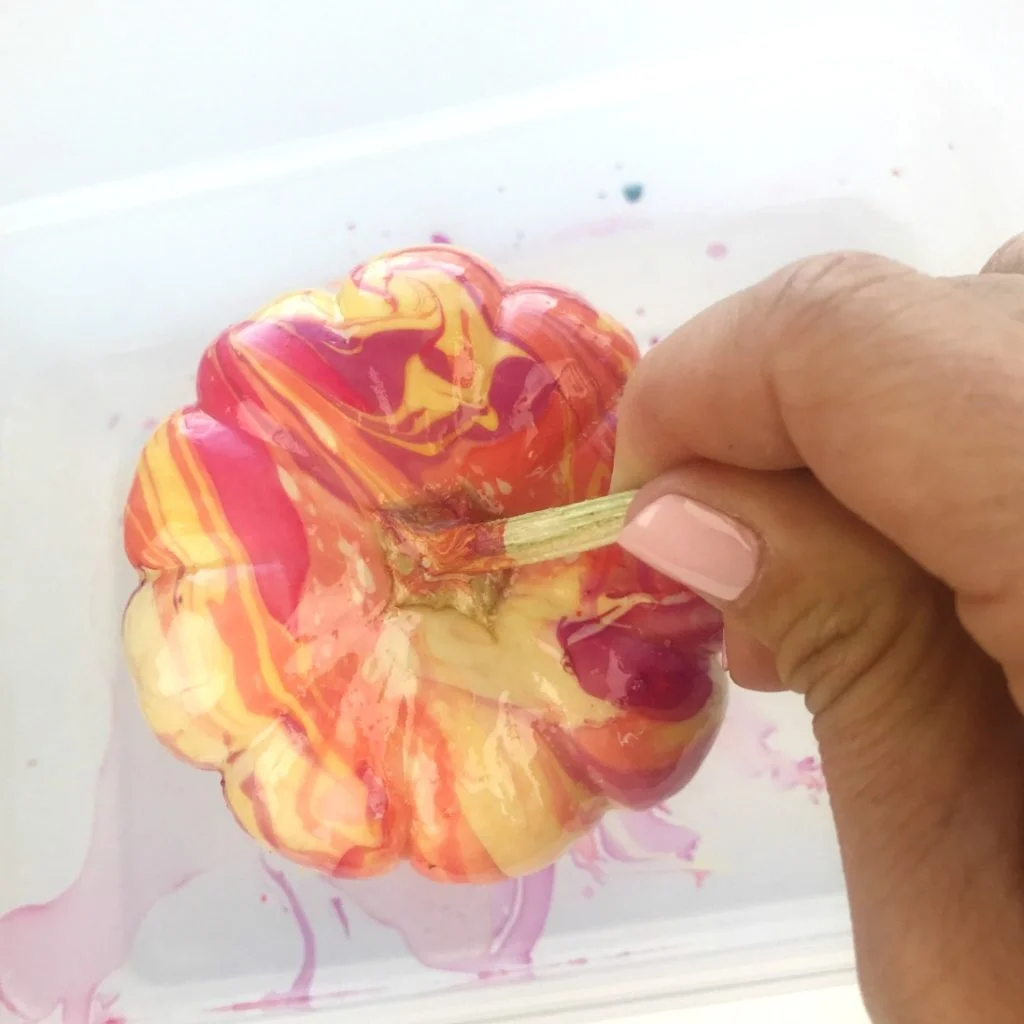
7. Remove the Pumpkin

Once the pumpkin is covered, remove it from the water. You can wipe away any excess polish that is hanging off the pumpkin with a Q-Tip.

Pumpkin that has been covered in nail polish

7. Let Dry

I dried my pumpkins on a piece of foam board I had but you could use wax paper with cardboard underneath. It took about an hour for them to fully dry. The bottom of the pumpkin took the longest.
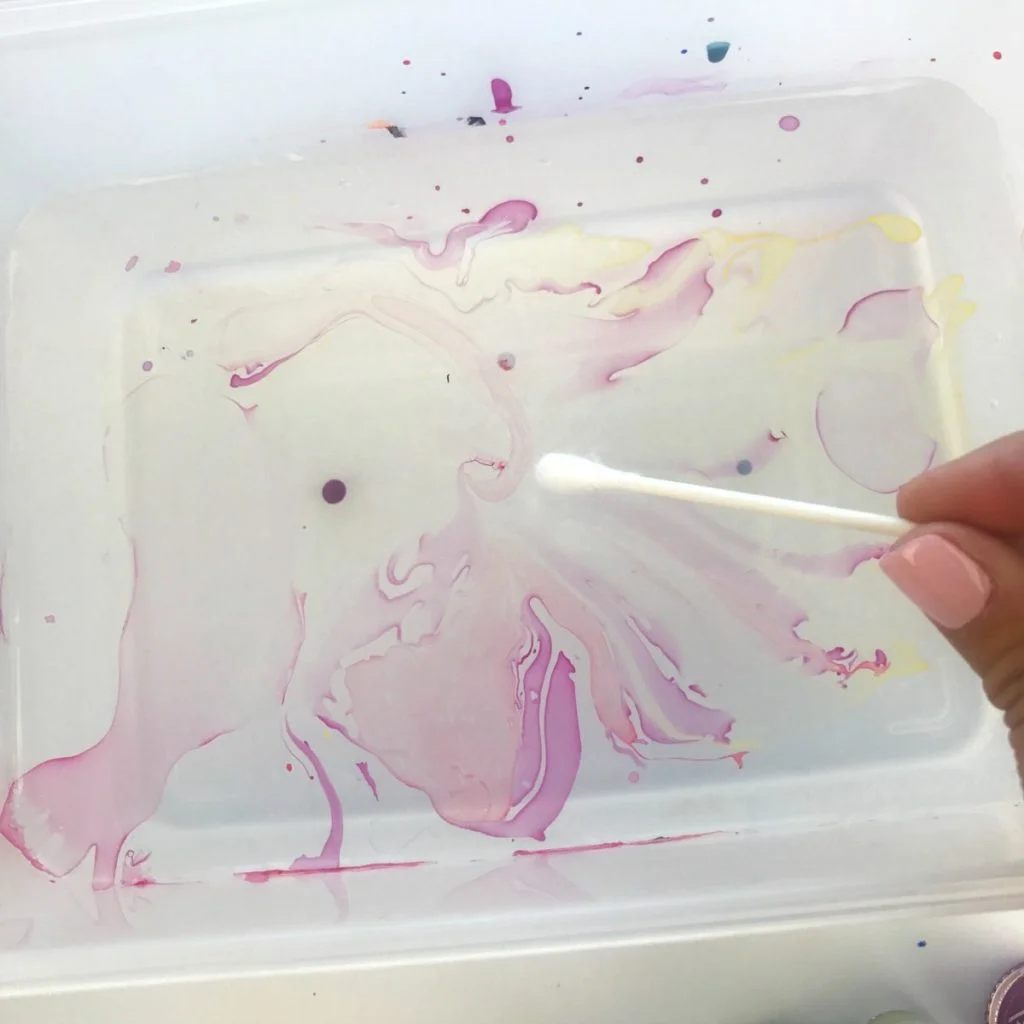
8. Clean the Water

To clean the water before you marble the next pumpkin, simply take a Q-Tip and move it around the surface of the water to collect any leftover polish.

Cleaning up the nail polish after marbling a pumpkin

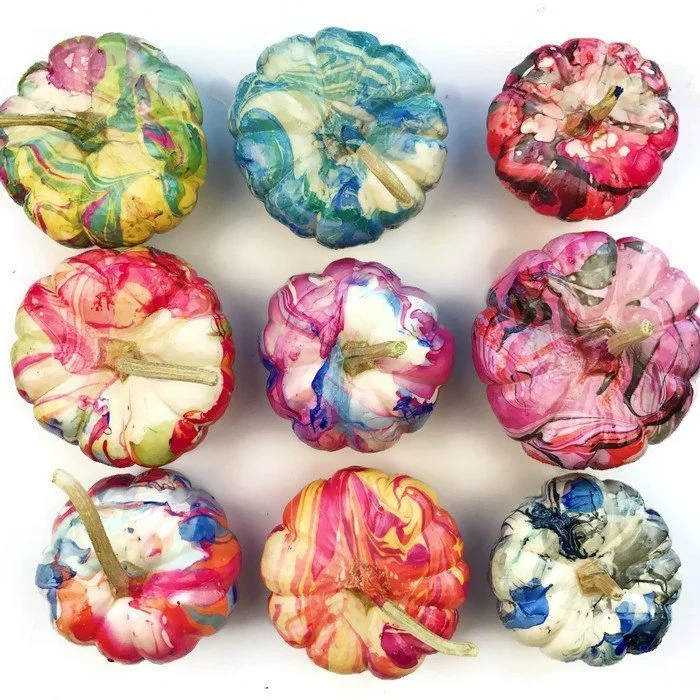
Finished Marbled Pumpkins

Finished examples from our How to marble a pumpkin using nail polish tutorial

Doesn’t that look like a fun fun Halloween craft! If you are looking for another colorful pumpkin decorating idea, you also have to check out my galaxy painted pumpkin tutorial and my melted crayon pumpkin tutorial.

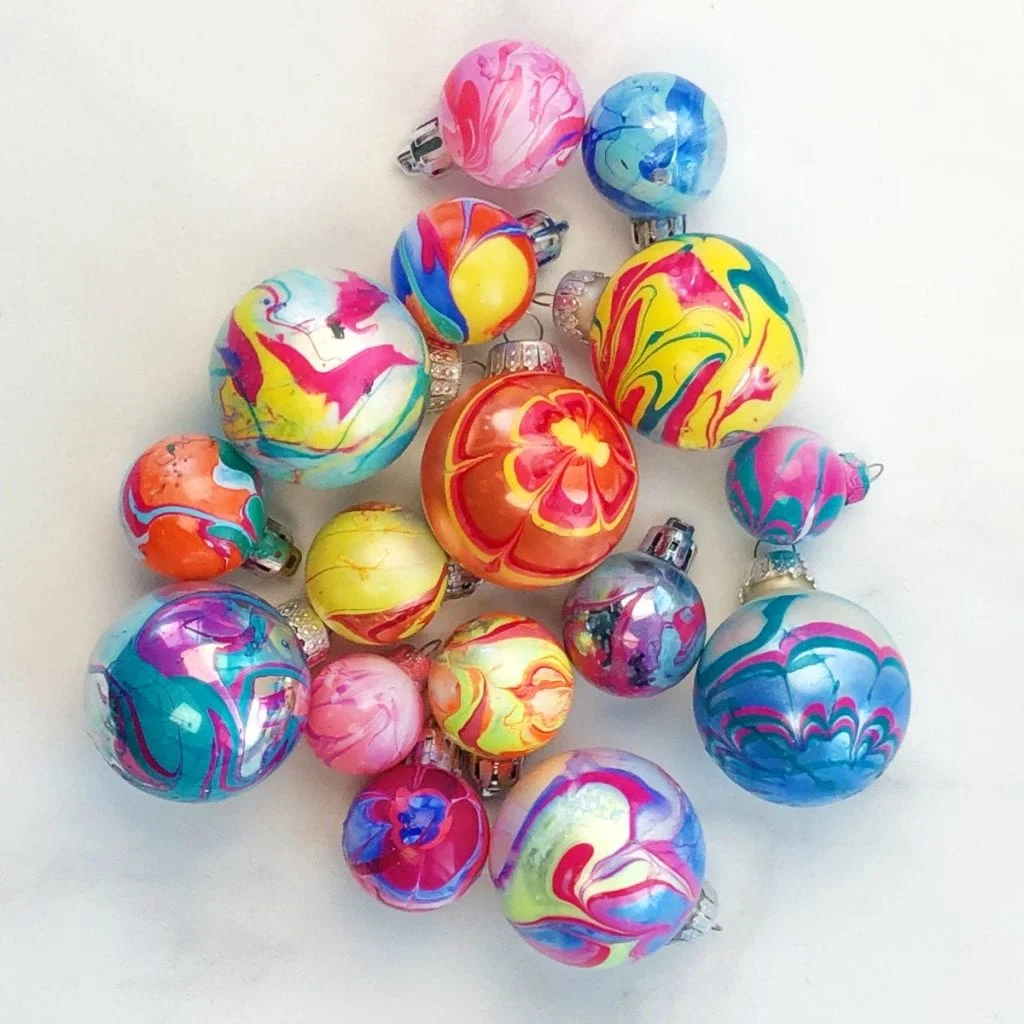
If you want to try another nail polish marbling project, check out these fun projects:

How to Marble Christmas Ornaments

Nail Polish Marbled Ornaments

How to Marble Ring Dishes

Nail Polish Marbling a Ring Dish

So are you ready to marble a pumpkin or maybe a dozen pumpkins! Let me know if you do! I’d love to see how they turn out. You can share a pic with me on Instagram or Facebook.

How to marble a pumpkin using nail polish

Sharing is caring!

Similar Posts

174 Comments

      1. You can use the crayons to write a message or draw on the pumpkins before you submerge in to paint. It will show the design or words on your pumpkin in a raised letter design.

      1. It could, the only problem is that some absorb too much water. Better to use real pumpkins if you can.

      1. The wax will crack and pop off and can also stain things that it touches. Try different shades of Krylon spray paint the same way she did the nail polish. We did with my mother and used the spray paint dipping plastic flowers. To avoid the clean up, line the pail with a trash bag and when finished we put several layers of newspaper on top to absorb left over paint, pour water out and throw the trash bag away. NO MESS.

  1. I am just in LOVE with these marble pumpkins!!!!!! I can’t wait to get going with this!! Those tiny pumpkins last for a long time!! I’m going to share this with a lot of my friends who like doing things with their hands!! It’s just such a wonderful idea!!!!!!! Thank you so very much!!!!!!!?

    1. Not sure if O.P.I will work. Sometimes the cheaper polishes work better bc they spread faster in the water. Plus they are cheaper :).

  2. Can you share the drying process? How quickly can you set them down? What do you place them on? THANKS! I love this idea!

      1. Maybe put some toothpicks in the styrofoam. Sticking halfway up and set the pumpkins on top of them, so they don’t stick to anything, the air can circulate underneath and they’ll dry faster

        1. I set them stem down through the hole on our kitchen pan handle. Set a weight in the middle of the pan. Also set some marshmallow roasting sticks and put the stem through the rails. That worked, too.

    1. You might need to prime those first with white primer in order for the colors to show up but it would be fun to try!

    2. We did something like this, back in ’77, using clean, dry seashell, then sprayed them with clear lacquer after they dried

  3. Can’t wait for my grandchildren to come do this. They are too old to dye eggs at Easter, but they will enjoy this.

  4. Wondering how this would work on other media, like glass or wood. Also, what kind of glaze or paint could I use to protect the marbling (and would it work on the other media)? I can see several uses for this process. Thanks.

    1. I definitely would work on other surfaces. To make the colors appear more I recommend a white spray primer on glass or wood. And an acrylic sealant to hep protect 🙂

    2. Yes! Many years ago, I used model car paints because by containing oil, it floated on top of the water very well. I used copy paper, cardboard, white and clear Christmas ornaments, etc. when using the oil based paints, I never used anything to seal it. After marbleizing the paper, I cut them into heart shaped and glued to paper heart-shaped doilies! Was not messy at all!

    3. You can use acrylic paint if you put some wallpaper glue in the water and water down the acrylic paint it will float and can be used on fabric, paper, wood … try anything that fancies you.

    4. Just bought nail polish in Christmas colors for the 5 g’children ages 4-9 to put on clear glass ornaments. Will have some clear plastic ones available just in case. Can hardly wait!

    1. It probably took about an hour. The key for the project to work with kiddos is making sure they know how quickly they need to work. The polish dries fast on the water so once it’s in they need to dunk 🙂

      1. I plan on making them with students in a center with a small group at a time and volunteer supervision.

    1. Hmm, not sure if glitter nail polish would spread well in the water. If it didn’t you could just add it after you marble.

    2. I tried the glitter polish and it didn’t cover very well as the color isn’t as intense as the regular colors and it didn’t spread very well in the water, I might try just brushing some on a finished one for added sparkle.

  5. I am into gourds and I plan on trying this process with the tiny egg gourds. I love the process you come up with. What do you think about this idea?

    1. I think it would be pretty on gourds. If you can’t find white ones you could always spray them with a white flat primer.

    1. It could, but it’s a little harder to get the marbled look with paint. Martha Stewart has a new marbling medium that I saw at Michaels which might be cool to try. It mixes with the paint.

    1. I bought mine at the Dollar Store and got many different colors as well as different colors of glitter polish too. The regular colors seemed tom work fine in the water.

    1. Gourds, ceramics, really you could prime anything with a white primer and marble it. You just don’t want it to be too large.

  6. Have you tried this with over types of paint? Acrylic or oil paints? I have 40 children I’d like to try this with and I’m not sure I can get that much nail polish ?

    1. For a large group of children I think paint marbling would be much better. I haven’t done it though so I don’t have tips but I do know that Martha Stewart has a marbling medium that I picked up at Michaels recently. You mix it with acrylic paint. I think that would be a great option.

  7. This is a great idea! I think I will do this for a team building exercise at my monthly staff meeting. Thanks!

    1. Oh wow, that’s a hard one. One bottle goes a long way. I made 12+ pumpkins using the bottles I have and most are still mostly full. I would get just get a rainbow of colors so you have variety. Make sure your room is well ventilated or you’re outside since the smell will be strong as you’re working.

  8. Have you seen the FB post about marbling on scarves? I am wondering if you could do this technique, with nail polish, on cotton t-shirts? Not sure what I am thinking but, would nail polish “work”?? HMMMM.

    1. I have seen that post! I shared it on my Facebook page. Aren’t those scarves beautiful. I’m not sure how polish would work on cloth. It might not be the right medium. Watered down acrylic paint and a marbling medium would probably work better.

  9. I’m having difficulty swirling the polish with a toothpick. The polish sticks to the toothpick. Any ideas what I can do to stop this?

    1. A few things. It might be your polish or the water temp or how quickly you are working. The polish dries quickly so the more dry it is the harder it is to swirl. Try putting your polish in all over and skip the toothpick part and see what happened! Mine were pretty well mixed even with out the toothpick. Not all polishes work well for marbling so that could be the main problem.

  10. My daughter I’d gonna have a Halloween birthday party and I think we are gonna try doing skulls instead of pumpkins. Thank you for posting this!

  11. Love this! Shared it with an art teacher at school. Have you tried larger pumpkins like the ones you’d set outside your front door? I’m trying to decide what proportions to use, if you’d have to do it in sections, etc. Any thoughts or advice?

    1. I think it would actually be pretty difficult with large pumpkins because you need to work very fast. The polish dries very quickly on the water and that’s why small pumpkins are the perfect size. Did you see my other post about doing melted crayon art on pumpkins? That one is actually much better suited for large pumpkins.

    1. I think it could!! If you can’t find light gourds you could always spray paint some white.

    1. I’m using white pumpkins I found at Trader Joe’s. If you can’t find white you can always spray paint some white.

  12. Just had lunch with my niece in Lincoln, NE. I shared this idea with her and she is excited to use this for a project for her Girl Scouts. Then, I didn’t know where to get mini pumpkins. Went to a grocery store, they had small ones , but not mini, for $3,99. I was crushed. Then as I was driving home, I found a pumpkin place and they had them 3/$2. Awesome, called my niece, she’s super excited. Better than that, The Country Pumpkin goes to Lincoln on Sundays to the Farmers Market on Old Cheney. I’m going to try making them to see if it is as easy as they look in your video, Sam. The pictures you have shared ‘made me smile.’ Thank you. Diann Aspen, Hastings, NE

    1. Yay! I hope you have so much fun making them. The key for sure is working quickly!!! Hope it goes well 🙂

  13. Can you use fake pumpkins instead of real ones? Will it work as well? What other brands of nail polish besides Sally Hansen have you tried and had success? My friends and I are so excited to try this project!

    1. You could use fake ones, plastic or ceramic would probably work best. Sally Hansen really works well and they are cheap that’s why I like them. Look for other polishes that work for nail marbling and they should work on this but most of the other brands are pricier.

  14. Thank you for the Great idea!Have a African Missions fundraiser dinner to decorate for tomorrow and this idea is fast and will add a lot of color!

    1. I haven’t. I just know that the Sally Hansen works well bc a lot of people use it for nail marbling.

  15. Went to the dollar store and bought wide assortment of colors of nail polish, including glittery ones to try. Need to get real mini pumpkins but bought a couple of stone ones to try. Hopefully will trial them out tomorrow before I buy the real ones. Also bought crayons to try the crayon method too. Will post if my cheap method works! Want to do it now but I am forcing myself to wait until daylight!

    1. I didn’t like my first attempt; just didn;t get coverage I wanted so will try again. My Dollar Store polish seemed to work fine in the regular blend but glitter didn’t show up much on the glitter one. I used a stone pumpkin I had primed with white paint and it worked fine.

  16. Don’t use top coats. My granddaughters wanted to use their glitter top coats and it didn’t work. It made the solid colors race to the edges of the container. It could be “painted” on after they dry.

  17. Love this idea can’t wait to try it with my grandkids. Also, IT’S MY BIRTHDAY too. Live my Halloween Birthday and always had a Halloween party when I was younger ❤️?

    1. Cheers to being a Halloween baby! I love that every year people and kiddos have lots of fun on my birthday 🙂

  18. We did this with ink on paper. . Look up Japanese paper marbling. . Sumanigashi? Our AHG 12-18 year olds had a great time and used the marbled paper to personalize composition notebooks.

    1. Not sure, but worth trying. You would probably want to spray paint it white first for the colors to show up.

  19. Would it work with a small, pie size, real pumpkin if you paint it white? Can you use white spray paint?

    1. You can definitely spray it white. I really like the white flat primer by Krylon for my crafts. I’ll add a link in the post.

    1. I definitely recommend a plastic container or something you don’t mind getting polish on.

  20. I just bought 24 pumpkins for my class to do this and just got what I could because pumpkins are limited but now I’m worried they’ll be too big. They’re around the size fits out together. What do you think worth trying or not? It’s for a family project with my students and parents so want it to be successful. It was so hard finding what I got. The others were super tiny. Thanks

    1. I would have them marble them by dipping from the side. And then add more polish to the water and dip the other sides. It will work, just might take longer.

  21. This is adorable!! I’m wondering if the pumpkins will always have that “nail polish smell”? Or does it go away once they are dry? What happened with your pumpkins? Thank you so much for sharing such an awesome art project!! ?

  22. I tried this, albeit not with the recommended polish. Definitely didn’t work. I thought “Oh I’ll try brown and orange for fall colors.” Nope, just looks like poo.
    Also, the polish didn’t spread evenly. #pinterestfail

    1. The kind of polish makes a BIG difference. Not all polishes work. That’s why I put the specific brand because I know many others don’t work.

  23. I tried doing this marble design on the vase and I’m interested to try this for Halloween and Christmas decoration.

  24. Hi, I tried this with mini white pumpkins (from Trader Joe’s). My only issue was that the polish didn’t always stick to the pumpkin. It was as if parts of the pumpkin “repelled” the mixture. So in those cases I dipped again which caused a clumping. I’d hate to have to use primer on an already white pumpkin as it seems an extra step. I even tried washing and drying one and had same issue.
    Any thoughts? Love this project!

    1. That’s so strange. I didn’t run into that problem at all. I think it’s okay though if not every inch is covered. It probably has a more designed look to it that way. Were you using the recommended nail polish?

  25. What defines room temperature for the water, 68,70 etc. I would think room temperature water of 68 would not work as well as room temperature water of say 75. Can you shed some light on this ?

  26. Hmmm. Tried this just now without my 6 year old but really didn’t have much luck. Let’s just say our pumpkins don’t look anything like the ones in the tutorial. ? Even tried just using Sally Hansen polish. When we stirred it with a toothpick all of the polish stuck to the toothpick. Any hints? It’s such a cute idea…

    1. So sorry, just seeing this now. Skip the toothpick part if it’s not working for you. If you don’t work fast enough, the polish dries and will stick to the toothpick.

  27. Wish I could post my pics in the comments! They turned out great but I do think with practice they would get better… different brands of polish did work differently as they had different textures in the water.

    1. So glad you had success! Yes, practice definitely helps as with anything :). Feel free to come share a pic on my Facebook page or tag me on IG.

Leave a Reply

Your email address will not be published. Required fields are marked *

This site uses Akismet to reduce spam. Learn how your comment data is processed.