How to Draw a Dragon
As an Amazon Associate, I earn from qualifying purchases. This post may contain affiliate links. See our full disclosure here.
Dragons can be scary, but they can also be adorable! If you’re trying to make a cute dragon drawing but need a little help, we’ve got you with this step to step drawing. Learn how to draw a dragon easily – even for total beginners.
Once you master this dragon drawing you’ll be able to add details and doodle adorable dragon friends on notebooks or sketch pads. It’s not just for kids, either; adults who want to learn how to draw should try this and our other easy drawing tutorials to master the basics.
In my opinion there’s nothing more fun (and relaxing) than drawing cute doodles.

Supplies Needed:
- Drawing paper or sketch book
- Pencil and sharpener
- Good quality eraser
- Fine tipped marker
- Coloring supplies
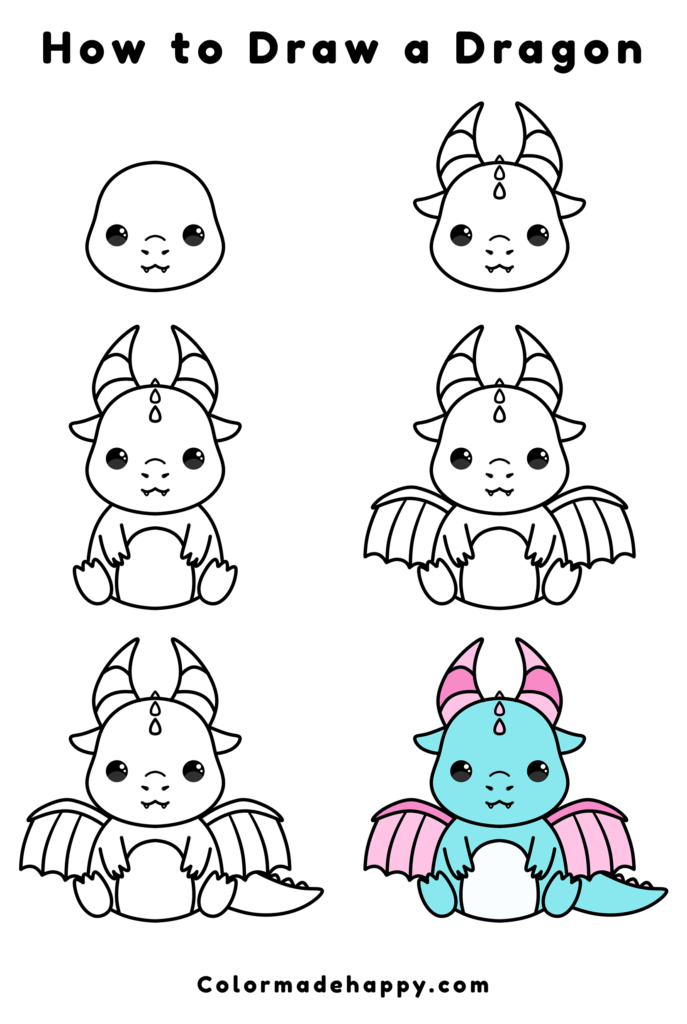
How to Draw a Dragon: Step by Step
I’m going to do my best to explain to you what to do at each step so you understand how everything goes together. You can look at the picture for a visual step by step, but I sometimes find a bit of instructions when you’re learning how to draw helps!
You might also like: 11 Easy Frog Drawing Ideas
Step 1: Draw the Head

The key here is to make sure your dragon’s head isn’t just a circle. If it’s easier, start with a circle first, then draw the inner shape (don’t forget to leave the outer bumps for the cheeks) inside. You can erase the outer circle now or later when you go over the drawing with a pen or marker.
After you draw the head shape, add the eyes about halfway down. To do the kawaii eyes, start with a large circle, then add two small circles (one big, one little) on the right side. These will be the white part. Color in the rest, leaving the inside of the small circles white.
Once you have your eyes in, add a nose bridge between them lined up just before the bottom of the eyes. Under the bridge add two lines for nostrils – this will give your dragon face that lizard look.
Finally, add the mouth with a w shape underneath. Don’t forget the fangs!
Step 2: Add Horns and Ears
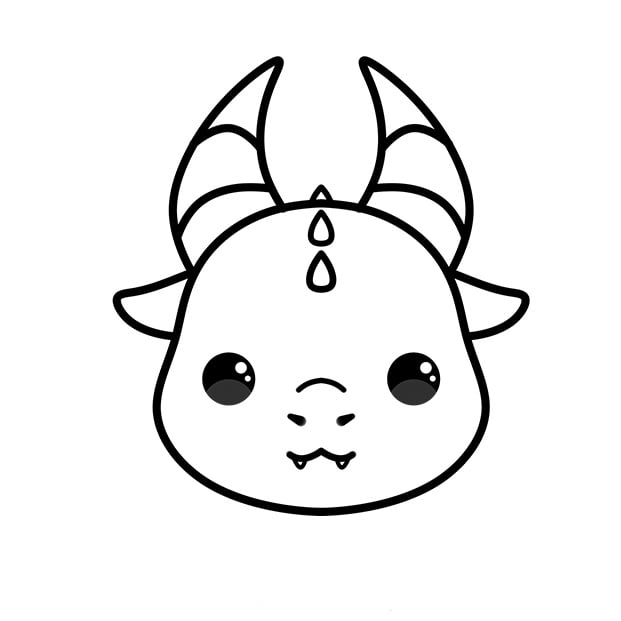
On the top of the head add two horns. They’re both the same, just mirrored. First draw the outer horn shapes, making sure they curve inward and taper at the top. Don’t forget to leave space in between on the top of the head. Then add stripes along the horns.
For the ears, start at the base of each horn, then go out and back in with your pencil so they end just above the tops of the eyes.
Once those are in place, add three smaller horns to the top of your dragon’s head.
Step 3: Draw the Dragon’s Body

You have a cute head now so it’s time to draw the body! Again, we’re not going for a perfect circle here; you’ll want the dragon’s body to start smaller and widen toward the bottom.
Tip: line your pencil up so it’s parallel to the outer part of the dragon’s eye. From there, start drawing down, letting your line get wider as you go. Scoop down and come back around the top until it meets the dragon’s head lined up with the other eye.
The dragon’s body should be about as tall as the dragon’s head.
It’s ok if you need a few tries to get this one right! Again, sometimes drawing a circle first can help (like you did with the head) so feel free to see what works for you.
Once you’re happy with your body shape, draw an arc for the stomach. Then add hands slightly overlapping the stomach (they shouldn’t be attached anywhere).
Finally, add the feet sticking out to the sides on angles. This will give your dragon a sitting look.
Don’t worry if you have pencil lines in between your hands or feet – we’ll fix those later.
Step 4: Add Wings

Can’t have a dragon without wings! They look complex, but are actually pretty simple once you break it down.
First, draw the top parts that will hold the wings. These will start just below the dragon’s head. As you draw the tops of the wings, curve up in line with the dragon’s face, then curve back down. Then draw another line under with the same curve and connect it to the outer part.
You can make your wings as small or large as you’d like.
Now all you have to do is add the three wing sections coming off the top of the wing. Don’t forget to give them a little arch at the bottom for extra detail.
Repeat on the other side trying your best to make them the same size and shape.
Step 5: Draw a Dragon’s Tail

You’re almost done! To draw the tail, start about halfway into the right wing and do a downward swoop (see picture). Then start in the middle of the foot and draw a curve before coming up to meet at your first line.
Add three bumps (or as many as you want) to the top of the tail.
Step 6: Ink and Color Your Dragon Drawing
You’re done, but your dragon drawing might not be perfect yet. If you have a lot of overlapping pencil lines this next step is really important.
- Using a thin tipped marker go over the lines you want to keep. Ignore any pencil marks you’d like to erase.
- Color in the eyes darker with the marker.
- Once the ink has dried, take a good quality eraser and erase over your whole drawing.
- You’ll be left with your final dragon drawing!
Once your drawing is done you can color it any way you like. Get creative and don’t be afraid to give your dragon some fun colors!