How to Draw a Rose
As an Amazon Associate, I earn from qualifying purchases. This post may contain affiliate links. See our full disclosure here.
Are you looking for something new to draw and unsure where to start? Try this simple how to draw a rose pencil drawing that’s done in just a few steps. These popular flowers seem complicated to draw, but they’re quite simple.
Below is a step-by-step beginner tutorial for drawing a rose flower illustration. It’s very easy to do using simple shapes and curved lines. Follow the instructions below to create your own beautiful rose.

Materials Needed to Create an Easy Rose
To begin your rose, you will need paper and a pencil. I also recommend grabbing fine-tipped markers for the finishing touches. These are my favorite markers for drawing and coloring.
I always start my projects using softer pencil marks for sketching and then outline them with a marker or colored pencil. This just assures me that I can fix any mistakes using an eraser instead of starting from scratch. If you know that you draw better with a marker or pen, go for it!
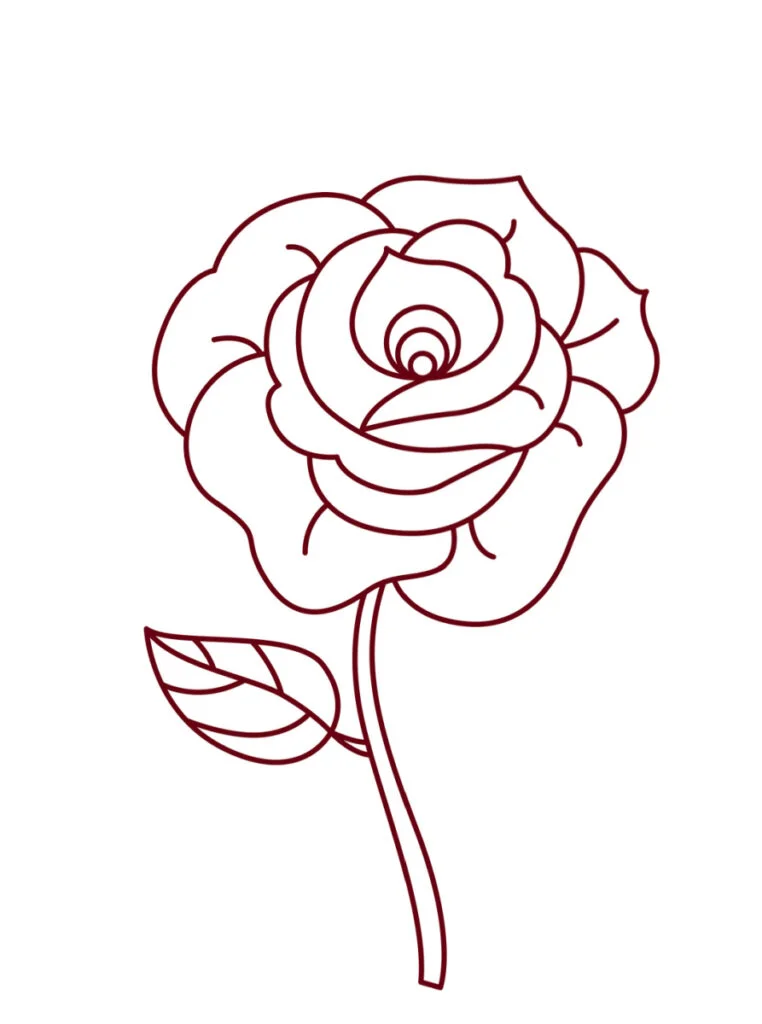
How to Draw a Rose
I created this simple rose drawing with each step shown to use as an easy model. Simply copy the rose tutorial from your tablet or mobile device or print onto paper. If you need more in-depth instructions for drawing your first rose, keep scrolling below.
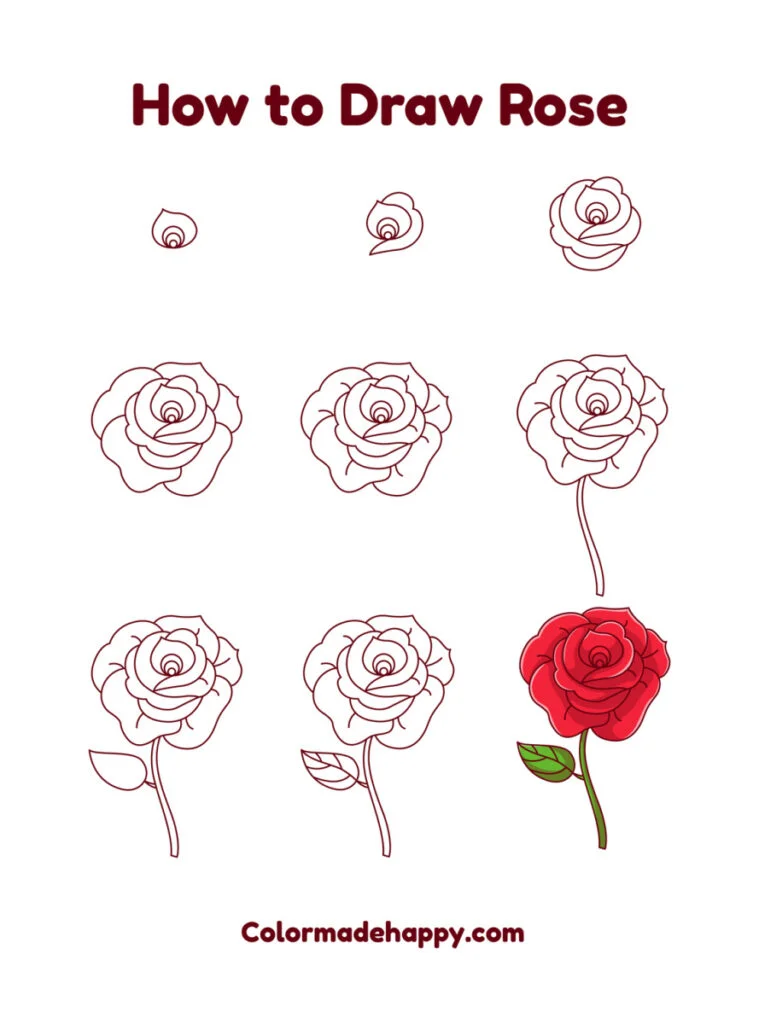
Step by Step Instructions to Draw a Rose
Step 1
Begin by drawing three small circles, each one a little larger than the last. Then draw the first inner petal with a pointer end. This just takes two rounded or curved lines around the three circles joined at the top in a V shape.
This will be the center of the rose. They don’t have to be a perfect circle, they can even be ovals if necessary. You just have to use these three circles as your center point.

Step 2
Next, you will draw a larger petal coming out from the inner petal part of the rose. Do this by creating a number heart shape that comes to a point. Then, bring it back into the three small circles you made earlier.
I like to connect mine with the smallest circle from the previous step so everything flows nicely. This will be your first set of petals.

Step 3
For this step, you will be able to get a little creative. You will be creating four layers to your rose. These will still serve as the inner petals of the rose, but you are adding body to your flower.
Simply add curvy lines on the left side and right side of the rose. Then, add a small outer petal with a few bumps. You will also create a semi-circle shape on the underside of the flower.

Step 4
Now you will be drawing your outer petals. Place five rounded and large petals around your inner petals. I like to make these different shapes since roses are never precisely uniform.
Add a petal or two that come to a point and others that a completely smooth. It’s up to you. I find that more variety in the rose petals makes for a more realistic rose drawing.

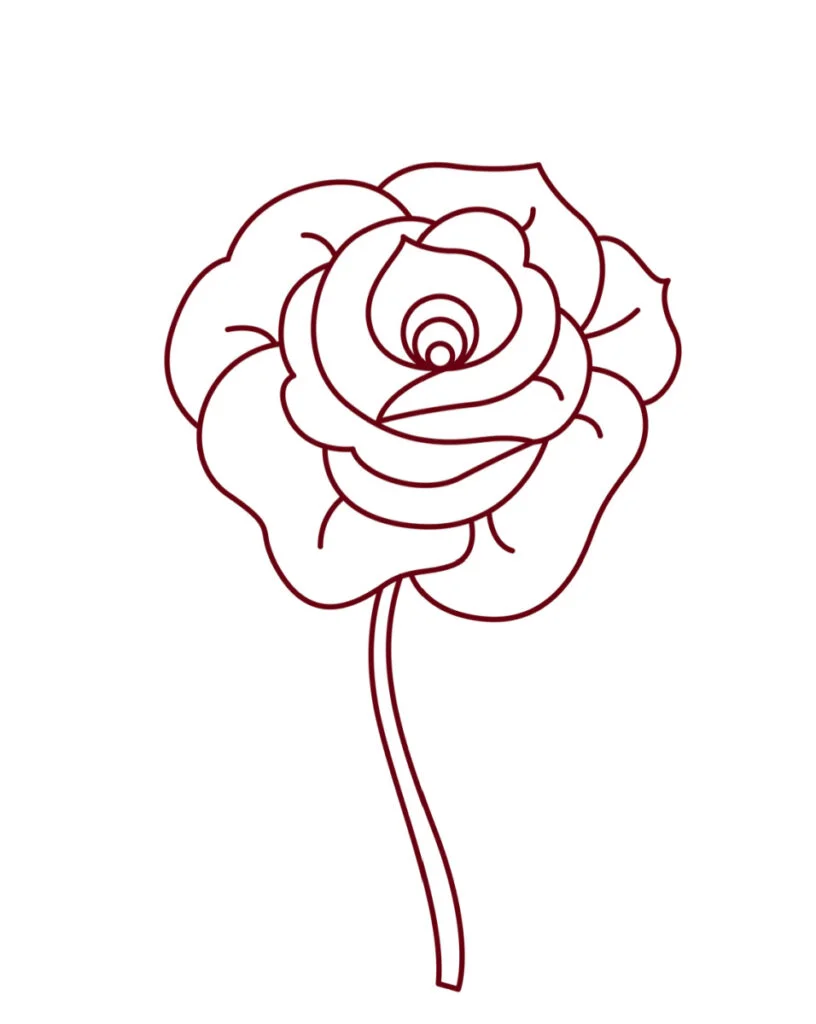
Step 5
This is one of the most straightforward steps. All you have to do is draw a few lines representing the creases and shadows you see on a real rose. I add either one or two lines to each petal.

Step 6
Now it’s time to add the stem of the rose. This is also an easy step. Simply draw a long, slightly curved line down, give it a blunt bottom, and then bring it back up to the base of the flower. Yes, that’s it. Just a couple of vertical lines for the stem.
Step 7
Using a small triangle shape and a teardrop shape, draw your leaf. Make it point slightly upwards so your flower doesn’t look droopy.

Step 8
Draw a line down the center of your leaf, going long ways. Then, add a few smaller lines branching outward to serve as the veins.
There, you have an easy rose drawing! This beautiful flower is fun to give away as a gift, place it on a homemade card, or hang it up in your home. Be proud, you drew that! Hopefully this little drawing lesson helped you create a gorgeous rose.
For more dimension and texture, add shaded areas on the outer edges of the flower petals. The darker areas will give it a little depth and make it appear more realistic. Don’t worry though, there is no perfect rose.
Can I Color My Rose?
Of course you can color your rose! Decorate it any way you would like. Use colored pencils or markers to color your rose and shade it in. I often doodle on top of cards so I always have birthday, get well, and thank you cards on hand. And you don’t have to always make a red rose. You can even color it in using different colors or even a rainbow of colors.
When to Draw a Rose
Draw a rose any time you would like. I like to use drawing as a form of relaxation. It’s a great time to unwind and let my thoughts wander as I put pencil to paper.
You can draw a rose for a special occasion such as Mother’s Day, Valentine’s Day or just because. There’s no right or wrong time to draw anything. Sometimes I even draw while I watch t.v. just to have something to do with my hands. Drawing flowers just happens to be one of my favorite things to draw. The final result is always beautiful.
More Drawing Ideas
Looking for more fun things to draw? Try How to Draw a Cat. This is a super simple drawing that anyone will enjoy.
I also have How to Draw a Hedgehog as well as Cute Things to Draw that has 35+ cute drawing ideas.
I hope you enjoyed learning to draw your own rose and check out some of my other drawing tutorials!