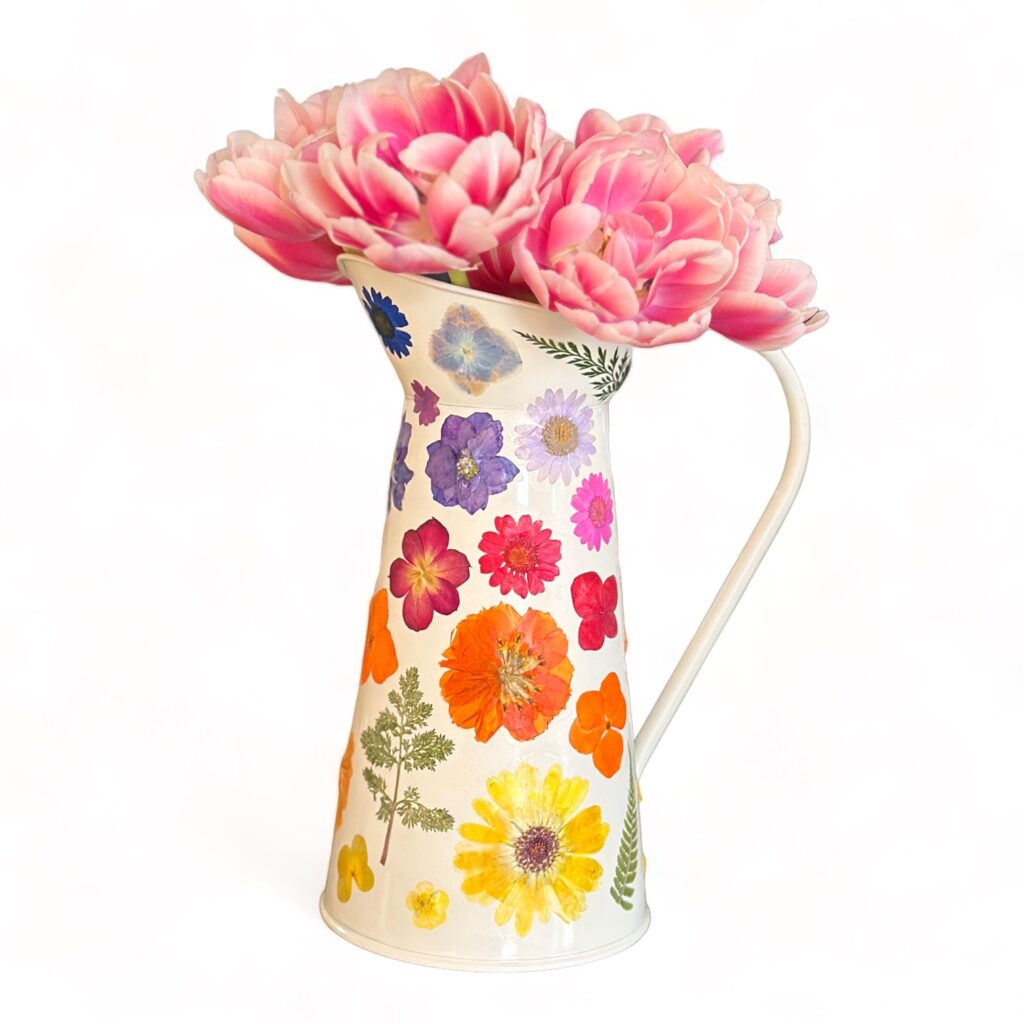
How to Make a Pressed Flower Vase
As an Amazon Associate, I earn from qualifying purchases. This post may contain affiliate links. See our full disclosure here.
Pressed flowers are one of my favorite crafting items. There are so many ways to use pressed flowers. The best part of pressed flower crafts is that you don’t have to press your own flowers! In this tutorial, I’ll guide you step-by-step on how to make a pressed flower vase and the best supplies to use.
Using this same technique, you can add pressed flowers to just about anything! If you like this dried flower craft idea, you should also check out my How to Make Pressed Flower Jars and Pressed Flower Ring Dish tutorials.
Supplies for Pressed Flower Vase
- Vase
- Pressed Flowers
- Mod Podge – I like to use matte versus glossy but either would work
- Paintbrush
- Tweezers (optional)
Directions
Step 1. Start by making sure your vase is clean of debris. Arrange the dried flowers on your workspace to clearly see all the options. NOTE: You can even layout on a separate piece of paper a rough design of flowers you want to use and the order in which they will be arranged.

Step 2. Beginning at the bottom of the vase, add Mod Podge directly to the vase in a small area where you will place the first flower.

Step 3. Place the flower and then add another layer of mod Podge directly on top of the flower to adhere all petals to the vase. Be gentle as you apply the glue as pressed flowers are delicate.

Step 4. Repeat Steps 2 and 3 as you work your way up the vase.

Step 5. Don’t be afraid to take apart any flowers that are too thick to adhere. You can use the petals on their own or put them together to form other shapes.

Step 6. Mix in greenery throughout to add another unique design element.

Step 7. Once you’ve covered the vase in flowers, go back and add an additional layer of Mod Podge on top of each element to ensure that they are all secure.

How to Customize a Pressed Flower Vase
- Pick a single color and use a variety of hues.
- Outline a shape onto the vase like a heart and fill in the shape with flowers.
- Match the colors to the holiday, ie. pastels for Easter, red and green for Christmas, etc.
- Add some ribbon or twine to the handle with a handmade tag.
- Draw other details onto the vase like a butterfly or bumble bee using acrylic markers.
- Add flowers in a unique design like a single straight or diagonal line.
Takeaway
Pressed flower vases are fun and easy to make. They are wonderful for adding beautiful table decor for parties and events. You can also display your finished vase on a shelf or a table. The dried flower vases also make great gifts for holidays and would be wonderful to give as a Mother’d Day gift.